 2
comments
|
Thursday, April 19, 2007
2
comments
|
Thursday, April 19, 2007
I just loaded a set of textures for commercial use in my store. This is a first for me as I have never shared the texture files I use to make my papers before. I have this habit of always having my camera with me so when I see something cool, like a splat of paint or bark on a tree, I snap away. And on our recent trip to Florida I took so many nature photos of the ocean, sand, plants, flowers, shells, rocks, etc. that I have yet to even come near to viewing all of them or using them as texture files in Photoshop. So I put together a set of eight that I have pretty much exhausted in my designs and put them up for sale so that other designers can utilize them in their kits. I hope they sell! In case you are a designer, here is a preview:

So I also thought that I'd share a little tutorial with you on how to make a texture from a photo and use it in Photoshop. Here goes (this is my first attempt at doing any kind of tutorial, so don't expect anything too fancy):
1. Open a photo of a texture or element you like in Photoshop or PSE.
2. Go to Image--Mode--Grayscale. Click yes to discard color.
3. Go to Enhance--Adjust Lighting--Brightness/Contrast. Select contrast.
4. Take the contrast as far as you can go to the right so that the image is mostly all black and white but not so black and white that you lose detail (in other words, very contrasty with some gray still left in).
5. Crop it into a square if you like to scrap 12x12 or similar as this makes it easier when using the texturizer in the filter menu.
6. Save the file as a PSD file in a location where you know it will be when you go to load it in the texturizer.
7. Open a blank document in Photoshop. Color it. Go to Filter--Texture--Texturizer. Click on the little arrow in a circle next the name of the currently selected texture. It will say "load texture." Click on it and find the file you just turned into a texture. Highlight it and click open. Now it is loaded in your texturizer and you just need to play around with the percentage and relief options to get the paper to look the way you want it to.
It is really very easy so go ahead and try it out. Keep in mind that this process works best with a photo taken with a really good lens and lots of megapixels. I shoot with a Canon Digital Rebel XT and for mostly all my textures I shoot with a macro 50 mm lens.
Here is a free texture for anyone who wants to make their own paper and practice using the texturizer like I just explained. This is a texture file I made from a photo of sand at the beach. Have fun with it! To use it, right click on it save it. It is a jpeg. Open it up in Photoshop and save it as a PSD file. No need to do any of the contrast stuff as I've already done it. Skip to step 7 in my tutorial and make a textured paper with it. You also have the option of opening it up as a layer and under layer menu select overlay and adjust the opacity to your liking. This is also a fun way to make paper but you can't add the relief to it that you can when you go through the texturizer under the filter menu.
Here is the texture freebie---personal and commercial use okay, no credit needed but would be nice :)
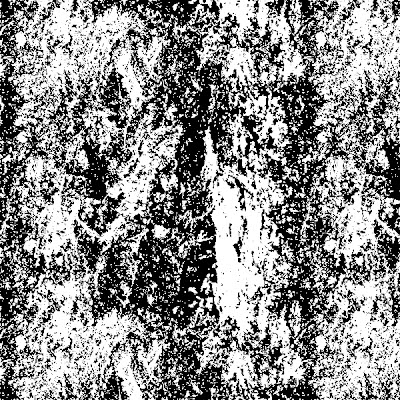
This is a sample of what it looks like as an overlay (I used a solid color orange background and didn't change the opacity at all--kind of cool, huh?):


As you can see, there is a BIG difference between using it as an overlay and manipulating it with the texturizer. Both are great ways to make papers and elements, so give it a whirl and the next time you come across something interesting with great texture, take a photo and try making your own texture files. My first tutorial in the field of digital scrapbooking is officially over. Hope you learned something!
Best,
Cyndi


2 Comments:
This tutorial is really great. Thanks for sharing.
2:57 AM
thank you very much for the freebie & the tutorial. I'll have to see if I can adapt it to my own software.
5:08 AM
Post a Comment
<< Home